DARPA Arm Robot Controlled via LabVIEW January 25, 2011
Posted by emiliekopp in code, labview robot projects.Tags: arm, code, control, darpa, labview, simulator
add a comment

By now, you’ve all heard of one of DARPA’s latest robotics projects, but just in case:
DARPA is introducing its Autonomous Robotic Manipulation (ARM) program. The goal of this 4 year, multi-track program is to develop software and hardware that allows an operator to control a robot which is able to autonomously manipulate, grasp and perform complicated tasks, given only high-level direction. Over the course of the program in the Software Track, funded performers will be developing algorithms that enables the DARPA robot to execute these numerous tasks. DARPA is also making an identical robot available for public use, allowing anyone the opportunity to write software, test it in simulation, upload it to the actual system, and then watch, in real-time via the internet, as the DARPA robot executes the user’s software. Teams involved in this Outreach Track will be able to compete and collaborate with other teams from around the country.
One of NI’s R&D engineers, Karl, has developed a LabVIEW wrapper for the DARPA arm simulator in his spare time and has graciously shared it on the NI Robotics Code Exchange (ni.com/code/robotics).
Using Karl’s code, you can directly control the arm simulator using LabVIEW. This means you develop your own control code and easily create UIs using LabVIEW’s graphical programming environment (two of the things LabVIEW is best for).
Check out Karl’s blog to request the code:
LabVIEW Robotics Connects to Microsoft Robotics Studio Simulator January 27, 2010
Posted by emiliekopp in labview robot projects.Tags: arm, connectivity, FPGA, labview, labview_robotics, lidar, microsoft, msrds, msrs, prototyping, rt_os, simulation, simulator
7 comments
Several people have pointed out that Microsoft Robotics Developer Studio has some strikingly familiar development tools, when compared to LabVIEW. Case in point: Microsoft’s “visual programming language” and LabVIEW “graphical programming language;” both are based on a “data flow” programming paradigm.

MSRDS Visual Programming Language
There’s no need for worry, though (at least, this is what I have to keep reminding myself). National Instruments and Microsoft have simply identified a similar need from the robotics industry. With all the hats a roboticist must wear to build a complete robotic system (programmer, mechanical engineer, controls expert, electrical engineer, master solderer etc.), they need to exploit any development tools that allow them to build and debug robots as quickly and easily as possible. So it’s nice to see that we’re all on the same page. 😉
Now, both LabVIEW Robotics and MSRDS are incredibly useful robot development tools, each on its own accord. That’s why I was excited to see that LabVIEW Robotics includes a shipping example that enables users to build their code in LabVIEW and then test a robot’s behavior using the MSRDS simulator. This way, you get the best of both worlds.
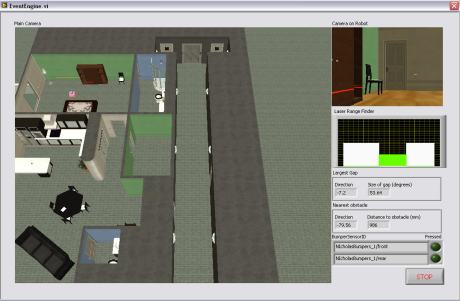
Here’s a delicious screenshot of the MSRDS-LabVIEW connectivity example I got to play with:
How it works:
Basically, LabVIEW communicates with the simulated robot in the MSRDS simulation environment as though it were a real robot. As such, it continuously acquires data from the simulated sensors (in this case, a camera, a LIDAR and two bump sensors) and displays it on the front panel. The user can see the simulated robot from a birds-eye view in the Main Camera indicator (large indicator in the middle of the front panel; can you see the tiny red robot?). The user can see what is in front of the robot in the Camera on Robot indicator (top right indicator on the front panel) . And the user can see what the robot sees/interprets as obstacles in the Laser Range Finder indicator (this indicator, right below Camera on Robot, is particularly useful for debugging).
On the LabVIEW block diagram, the simulated LIDAR data obtained from the MSRDS environment is processed and used to perform some simple obstacle avoidance, using a Vector Field Histogram approach. LabVIEW then sends command signals back to MSRDS to control the robot’s motors, and successfully navigates the robot throughout the simulated environment.
There’s a tutorial on the LabVIEW Robotics Code Exchange that goes into more detail for the example. You can check it out here.
Why is this useful?
LabVIEW users can build and modify their robot control code and test it out in the MSRDS simulator. This way, regardless of whether or not you have hardware for your robot prototype, you can start building and debuging the software. But here’s the kicker: once your hardware is ready, you can take the same exact code you developed for the simulated robot and deploy it to an actual physical robot, within a matter of minutes. LabVIEW takes care of porting the code to embedded processors like ARMs, RT OS targets and FPGAs so you don’t have to. Reusing proof-of-concept code, tested and fined-tuned in the simulated environment, in the physical prototype will save the developers SO MUCH TIME.
Areas of improvement:
As of now, the model used in the LabVIEW example is fixed, meaning, you do not have the ability to change the physical configuration of actuators and sensors on the robot; you can only modify the behavior of the robot. Thus, you have a LIDAR, a camera, two bumper sensors and two wheels, in a differential-drive configuration, to play with. But it’s at least a good start.
In the future, it would be cool to assign your own model (you pick the senors, actuators, physical configuration). Perhaps you could do this from LabVIEW too, instead of having to build one from scratch in C#. LabVIEW already has hundreds of drivers available to interface with robot sensors; you could potentially just pick from the long list and LabVIEW builds the model for you…
Bottom line:
It’s nice to see more development tools out there, like LabVIEW and MSRDS, working together. This allows roboticists to reuse and even share their designs and code. Combining COTS technology and open design platforms is the recipe for the robotics industry to mirror what the PC industry did 30 years ago.
National Instruments Releases New Software for Robot Development: Introducing LabVIEW Robotics December 7, 2009
Posted by emiliekopp in industry robot spotlight, labview robot projects.Tags: a*, arm, crio, exclusive, labview_robotics, lidar, national_instruments, new_software, robot_revolution, sbRIO, starter_kit, ugv, velodyne
2 comments
Well, I found out what the countdown was for. Today, National Instruments released new software specifically for robot builders, LabVIEW Robotics. One of the many perks of being an NI employee is that I can download software directly from our internal network, free of charge, so I decided to check this out for myself. (Note: This blog post is not a full product review, as I haven’t had much time to critique the product, so this will simply be some high-level feature highlights.)
While the product video states that LabVIEW Robotics software is built on 25 years of LabVIEW development, right off the bat, I notice some big differences between LabVIEW 2009 and LabVIEW Robotics. First off, the Getting Started Window:
For anyone not already familiar with LabVIEW, this won’t sound like much to you, but the Getting Started Window now features a new, improved experience, starting with an embedded, interactive Getting Started Tutorial video (starring robot-friend Shelley Gretlein, a.k.a. RoboGret). There’s a Robotics Project Wizard in the upper left corner that, when you click on it, helps you set up your system architecture and select various processing schemes for your robot. At first glance, it looks like this wizard is best suited for when you’re using NI hardware (i.e. sbRIO, cRIO, and an NI LabVIEW Robotics Starter Kit), but looks like in future software updates, it might include other, 3rd-party processing targets (perhaps ARM?)
The next big change I noticed is the all-new Robotics functions palette. I’ve always felt that LabVIEW has been a good programming language for robot development, and now it just got better, with several new robotics-specific programming functions, from Velodyne LIDAR sensor drivers to A* path planning algorithms. There looks to be hundreds of new VIs that were created for this product release.
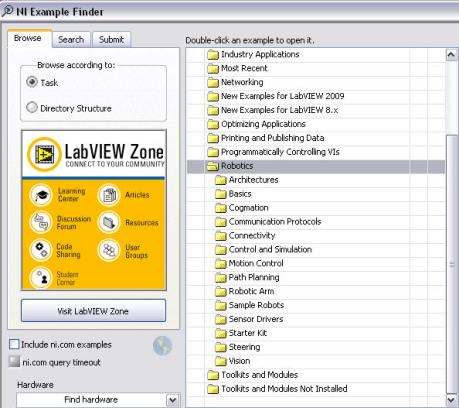
Which leads to me to the Example Finder. There’s several new robotics-specific example VIs to choose from to help you get started. There’s some examples that help you connect to third-party software, like Microsoft Robotics Studio or Cogmation robotSim. There’s examples for motion control and steering, including differential drive and mechanum steering. There’s also full-fledge example project files for varying types of UGV’s for you to study and copy/paste from, including the project files for ViNI and NIcholas, two, NI-built demonstration robots. And if that’s not enough, NI has launched a new code exchange specifically for robotics, with hundreds of additional examples to share and download online. ( A little birdie told me that NI R&D will be contributing to the code available on this code exchange in between product releases as well.)
This is just my taste of the new features this product has. To get the official product specs and features list, you’ll have to visit the LabVIEW Robotics product page on ni.com. I also found this webcast, Introduction to NI LabVIEW Robotics, if you care to watch a 9 minute demo.
A more critical product review will be coming soon.
Looks like the robot revolution has begun.


